Liquid NanoTint Performance Evaluation
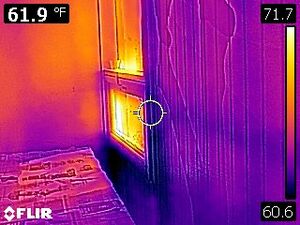
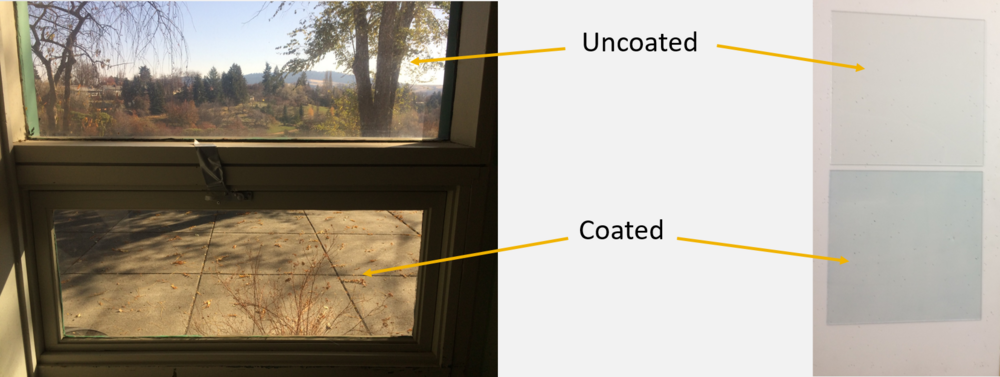
| This image shows the effects of applying NanoTint to the lower window and leaving the top window uncoated. The coated window itself is higher in temperature but the wall just to the left is cooler than the wall next to the uncoated window. | |
| Sponsors | Drywired |
| Team Name | Sunscreen |
| Duration | Fall 2018 - Spring 2019 |
| Faculty Adviser | Dr. Matthew Swenson |
| Clients | DryWired
Avista Utilities Fred Pollard |
| Team Members | Kendra Wallace
Russell Stein Chancler Vander Woude Oscar Lopez |
The scope of this project is to test the effectiveness of DryWired's NanoTint in a real world setting by applying it to UI's Golf Pro Shop and comparing data before and after application.
Design and build a portable demonstration unit to conduct small scale tests of the material.
Problem Definition[edit | edit source]
Background[edit | edit source]
An enormous amount of energy is spent heating and cooling our buildings and much of it is wasted through the building’s windows. Most options to help insulate windows and reduce solar heat gain are expensive or block out most of the window’s visible light. Liquid Nanotint offers a cheap and easy to apply coating that claims to block almost all UV and IR rays while reducing visible light transmission very little. We will be applying Liquid Nanotint to University of Idaho’s Golf Pro Shop in order to quantify the coating’s effectiveness and electricity use reduction in a real-world setting. We will also be building a demonstration unit that will show Liquid Nanotint’s benefit’s and effectiveness in real time to prospective clients.
UI Golf Pro Shop[edit | edit source]
Project Deliverables
- We will be applying Liquid Nanotint to University of Idaho’s Golf Pro Shop in order to quantify the coating’s effectiveness and electricity use reduction in a real-world setting.
Specifications[edit | edit source]
The Golf Pro Shop NanoTint application should meet the following requirements:
- Liquid NanoTint should be almost unnoticeable and should not block more than 40% of visible light transmission (VLT).
- Energy saving analysis and comparison to previous years.
- The coating should be professional and withstand day-to-day wear.
- Documentation and analysis of the coating process.
Project Learning[edit | edit source]
Liquid Nanotint is a thermal barrier coating applied like paint to windows. It blocks 99.9% and 95% of ultraviolet and infrared radiation respectively while transmitting up to 78% of visible light. This allows it to drastically reduce the solar heat gain from windows without negatively impacting window visibility or aesthetics. It’s much cheaper than alternatives, costing only $2-$3 per square foot.
Application
- Safety
- High concentration methanol is used to apply Liquid Nanotint, which is highly flammable and toxic in liquid and vapor forms. As such, Nanotint should be applied away from heat, sparks, open flames, and hot surfaces. Protective gloves, clothing, and eye protection should be used. If applying indoors or in any poorly ventilated area, dual cartridge respirators should be used.
- Procedure
- Application requires ambient temperatures of 45-95 degrees Fahrenheit and less than 70% relative humidity.
- Application occurs with three steps; buff, primer, and Nanotint applications.
- Buffing serves to remove oils and smooths the application surface.
- Priming involves 90% methanol and prepares the window for the Nanotint coating.
- Lastly, the Nanotint coating is mixed and applied using a painter’s roller and a specific technique that minimizes streaking and other defects.
- Lessons Learned
- Nanotint must remain above 45°F for the entire curing process.
- When Applying you have a little over 5 minutes to coat the window before the Nanotint will start hardening and cause pebbling when rolled.
- Primer will strip dye from microfiber cloths and get on the window.
- Lint free KimWipes work great for cleaning and priming the windows.
- Once you have begun application of Nanotint you cannot go back and try to fix impurities or inclusions as it will cause pebbling and potentially make them worse. Continue the application steps as directed and the issue may be remedied.
Design Validation[edit | edit source]
| Requirement | Test | Target Date | Result | Recommendation |
|---|---|---|---|---|
| Liquid NanoTint should be almost unnoticeable and should not block more than 40% of VLT | Use a VLT meter to measure the amount of visible light that is coming through the windows | 02/30/2019 | Larger windows showed pebbling and uneven surface due to cold temperatures while curing | Remove tint and reapply with warmer outdoor temperatures to avoid defects from forming again |
| Obtain energy savings | Place HOBO sensors on windows and electrical panel to measure temperature and electricity draw | July 2018 - April 2019 | Continually and consistently collect data from sensors | N/A |
| The coating should be durable and not be able to be removed by standard window cleaning practices | Use window cleaning procedures and observe any peeling, cracking, bubbling, or fading | 02/30/2019 | Used Windex to clean windows | Do not try to clean until the coating is fully cured |
| Dust or other contaminant inclusions should be kept below 0.5 inclusions per square inch | Sample random square inches of the window for visible inclusions to determine rate | 02/30/2019 | There were multiple inclusions within a square inch | Turn off HVAC system and movements near the window |
Demonstration Unit[edit | edit source]
Project Deliverables
- We will be building a demonstration unit that will show Liquid Nanotint’s benefit’s and effectiveness in real time to prospective clients.
Specifications[edit | edit source]
The demonstration unit must meet the following requirements:
- Quantify the difference in UV between coated and uncoated panes of glass.
- Quantify the difference in IR between coated and uncoated panes of glass.
- Quantify the difference in VLT between coated and uncoated panes of glass.
- The total system should not exceed 20 lbs.
- Must be portable.
- Size should not exceed 2.5' by 2.5'.
- The unit needs to withstand travel and shipping.
- Aesthetically pleasing and professional.
Project Learning[edit | edit source]
The most significant lessons came from the thermocouple stands. To cut the stands out of 1/4" thick clear acrylic using a laser cutter, located in the Gauss Johnson building, masking tape was applied to the bottom of the acrylic to prevent the gas released to ignite and cause burn marks. Another lesson learned was to increase the distance between the thermocouple stand and the glass because the coated glass itself has a higher temperature than the uncoated glass (as shown in the first picture at the top of this webpage) but is cooler on the other side.
Design Considerations[edit | edit source]
The first design (left) Made from 8020 aluminum extrude this design puts both pieces of glass side by side. This design is very stable, but much larger and takes longer and requires additional setup. The bulk also makes it harder to transport unless you want to increase the setup time even more.
The second design (right) This design is a box with two walls on top with slots in them to allow glass to slide into them, making it easy to switch between coated and uncoated panes of glass. The box in this design allows storage of testing components and equipment underneath. Uses multiple slots in the wood to allow for quick setup and tear down it giving it portability. The downsides of this design is that it is not possible to compare both panes of glass at the same time and the frame is considerably more fragile as it's made up of wood.
Final Design[edit | edit source]
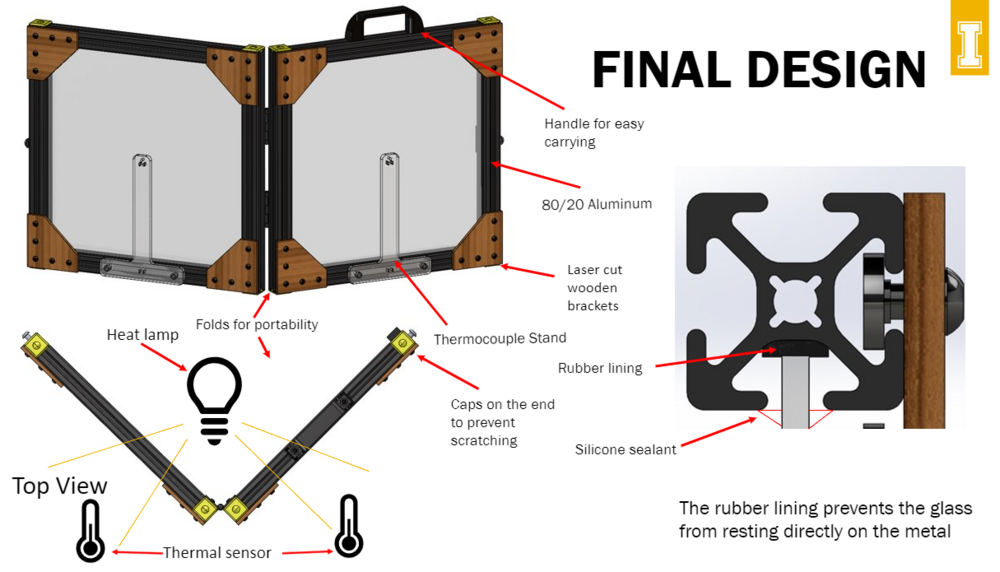
While making alterations to our previous designs we came upon the design above. In selecting this design we strove to meet the design parameters that it must be small, lightweight, portable, and cost effective. This design takes into account all of these design considerations and has the added perks of professional aesthetics. Our final design is made up of two aluminum frames each containing a one pane of glass, one coated with Liquid Nanotint and one uncoated, that fold on hinges allowing it to be folded into a smaller size for transportation. In addition to the hinges a latch and handle were added to help keep the folded frames together and make it easy to transport respectively. Another very important aspect of this design is that it makes running live action tests on both panes of glass at the exact same time extremely easy.
Design Features
- Handle for easy transportation
- Hinges for portability
- Latch for portability
- Wood engraved corner brackets for aesthetics
- End caps and rubber stopper between frames for safety
- Thermocouple stand for live action testing
Design Specs:
- Wieght: 9lbs
- Dimensions folded: 14.25" x 2.75" x 15.25"
- Dimensions unfolded: 28" x 1.25" x 15.25"
Design Validation[edit | edit source]
| Requirement | Test | Target Date | Result | Recommendation |
|---|---|---|---|---|
| Demonstrate the difference in UV between coated and uncoated panes of glass | Attach a UV sensor to tabletop demonstration and measure the amount of UV coming through (Linshang LS110A Split Transmittance Meter Window Tint Meter to measure UV at 365nm) | 03/01/19 | Uncoated: 9.6% blocked
Coated: 99% blocked |
N/A |
| Demonstrate the difference in IR between coated and uncoated panes of glass | Using heat lamp, measure the amount of IR that is coming through both panes of glass (LS110A Split Transmittance Meter Window Tint Meter to measure IR 950nm) | 03/01/19 | Uncoated: 17% blocked
Coated: 76% blocked |
N/A |
| Demonstrate the difference in VLT between coated and uncoated panes of glass | Use a VLT meter to measure the amount of visible light that each pane is allowing through (LS110A Split Transmittance Meter Window Tint Meter to measure VL 550nm) | 03/01/19 | Uncoated: 8% blocked
Coated: 18% blocked |
N/A |
| Total system should not exceed 20 lbs | Weight the total system (including glass) on a scale | 03/01/19 | Total system weights just under 9lbs | Reduce the size of the glass slightly and therefore the frame would also be smaller. This would reduce the weight slightly. |
| Size should not exceed 2.5' by 2.5' | Measure the width and length of unit folded and unfolded | 03/01/19 | Dimensions Folded: 14.25" x 2.75" x 15.25"
Dimensions unfolded: 28" x 1.25" x 15.25" |
You can reduce the base dimension by using shorter bolts |
| Unit is highly portable | The unit can be easily altered into its folded form with little to no effort and carried or moved by the standard adult | 03/01/19 | Tested with multiple other student and faculty and all agree that the unit fits both criteria. | The only complaint is that the handle is small for larger hands you can purchase or put a larger handle on the unit |
| Unit is able to be shipped by standard shipping procedures | Needs to fit into a standard shipping box and withstand standard shipping practices without damage to the unit. Use ASTM D7396 testing procedure. | 03/01/19 | The unit fits inside of a standard fed ex shipping box that we had available from when we received our glass from Drywired. TBD on damage | Put a pad between the glass to take some of the impact and prevent frames from hitting. |
Team Members[edit | edit source]
Additional Documentation[edit | edit source]
This wiki page was created by Oscar Lopez. Last update: 05/06/2019
