Mastercam Milling Operations
The milling process in Mastercam uses the Contour toolpath. This is used to face edges and create filleted corners parallel to the tool(see the third image in the table).
| Image | Step |
|---|---|
|
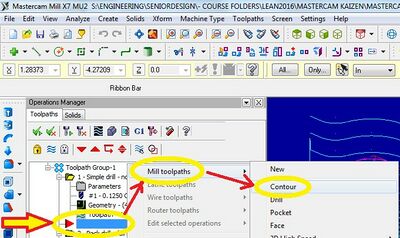
You can create a Contour toolpath by either following the process shown to the left, or by clicking on 'Toolpaths','Contour' in the uppermost toolbar. | |
|
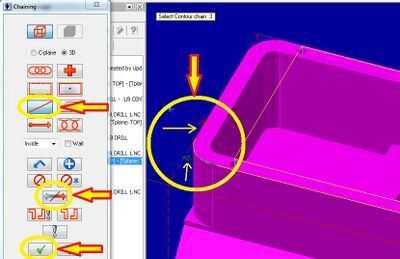
Mastercam will now ask you to select the edges to mill. You can do this a few ways, this image shows how to use the individual edge selection. If you do it this way, make sure the arrows(in the yellow circle) are facing in the correct direction for a continuous cut. Select the reverse button to switch the direction of a chain. Click on the green check mark when you're done. | |
|
When the next window opens, click Contour, then click on 'Tool'. Next, click 'Select Library Tool', find your tool in the library, and double-click it. If you cannot find the tool you need, uncheck the 'Filter Active' box. | |
|
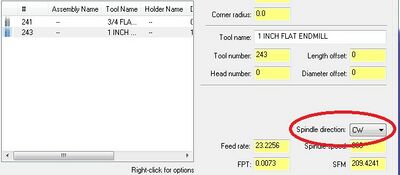
Make sure the correct tool is selected in the window, then correct 'Tool #','Spindle direction','Feed rate', and 'Spindle speed'. Feed rates and spindle speeds can be found using the charts in the machine shop and are based on tool, tool size, and material. Spindle direction will depend on whether you want to climb-mill or conventional-mill. Also, make sure that 'Plunge rate' is lower than 'Feed rate'. | |
|
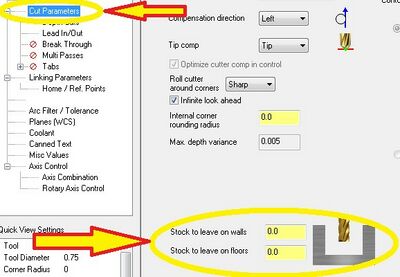
If you plan on using the same tool for finishing and roughing set the two 'Stock to leave...' sections to zero. If you plan on using a different tool for finishing, set 'Stock to leave on walls' to about 20 thousandths for the roughing toolpath, then to zero for the finishing toolpath. | |
|
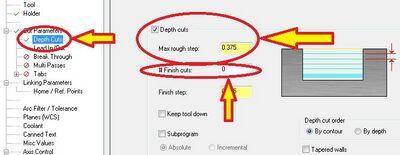
Next, click on Depth Cuts, setting your max rough step(the most the machine will take off in one pass). For finishing, set a number and step size for finish cuts. Usually you'll want multiple small cuts for a nice finish. If you used a different tool for roughing and finishing, set '# Finish cuts' to zero for the roughing toolpath and set 'Max rough step' to zero for the finishing toolpath. Note: The max rough step should never be greater than the diameter of the tool you're using. | |
|
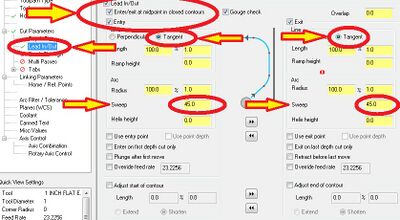
The Lead In/Out tab is used to reduce load on the tool and improve the cutting effectiveness at entry and exit. Checking the 'Lead In/Out' box at the top, selecting 'Tangent' under 'Entry' and 'Exit' and setting 'Sweep' to either 45 or 90 generally works well. | |
|
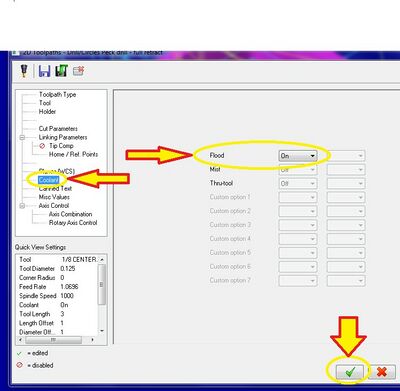
In the Coolant window, set 'Flood' to 'On'. You are now done a milling toolpath. Click the check mark to finish the toolpath. If you are using a different endmill to finish, repeat the process following the changes given in steps 6 and 7. |
