Water Egress Simulator
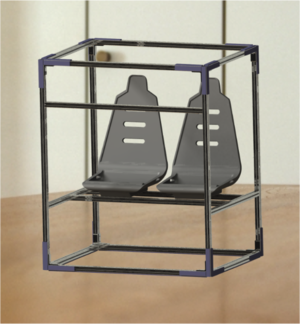
| CAD Model for the Final Product of the Simulator | |
| Client : | United States Department of the Interior |
| Team Name : | Aqua Egression |
| Duration : | Summer 2015 - Fall 2015 |
| Faculty Advisors : | Dr. Steve Beyerlein |
| Mentor : | Theo White |
| Group Members : | Ali Alfayez (Wiki Page)
Abdulhady Alhajeri (Secretary) Jacob Lemmelin (Client Contact) Colin Sowards (Budget Person) |
The task of Team Aqua Egression is to develop a water egress simulator that belongs to the United States Department of the Interior (USDOI). This simulator was designed to train pilots how to escape from their plane incase of submerge. The process is to strap down two trainees inside the simulator using seatbelts. Then other assistances with push the simulator to a pool until it hits the pool’s bottom. Trainees will be given a signal to start unstrapping their selves and egress from the simulator.
Problem Definition[edit | edit source]
Problem Statement[edit | edit source]
The USDOI reported that their simulator, which was made out of PVC material, suffers from broken joints while shipping the simulator from a place to another. Moreover, mesh seats were not comfortable for trainers. They needed such a simulator that will make it more reliable and last longer especially when shipping the simulator frequently.
Goal[edit | edit source]
The goal of the project is to design a simulator that will be lighter, stronger, easy to assemble and disassemble, transportable and affordable.
Background[edit | edit source]
According to Rick Gividen, chief training division at the U.S. Department of the Interior, the idea came after two accidents occurred at the U.S. Department of the Interior in 2010 and 2013 where the pilots hardly escaped from the plane. Now, new pilots at the U.S. Department of the Interior have to go through a course where they are strapped in the simulator and pushed into a pool then try to escape from simulator. As a result, the U.S. Department of the Interior demands such simulators that could be stronger that the current design. The reason of that is simulators are shipped from a city to another city and maybe from a state to another state. Shipping is one of the reasons why the current simulator has cracks and breaking joints.
Specifications[edit | edit source]
- Capacity: Seat 2 people 5’ – 6’4” comfortably 4’6” – 6’9” uncomfortably.
- Water Proof: Components should be water proofed and corrosion resistance.
- Shipping Boxes: Final contents of shipping must not exceed 75 lbs. /box and 108" in length and 165" in length plus girth.
- Toleration: Broken assemblies both through shipping or use must be economically feasible and field reparable. 50% weight variance between seats. I.e. 300 lbs./150lbs seat.
- Cost: Less than the cost of current (pipe + fittings + seats + seatbelts + netting + glue + labor) + cases = $2,217.8.
- Assembly: Assemble in less than 1 hour.
- Disassembly: Disassemble in less than 1 hour.
Design Concepts and Prototypes[edit | edit source]
Choosing a Material[edit | edit source]
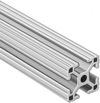
Since PVC was not a good material to use for such simulators that are shipped frequently from a place to another, substituting PVC with another material was the start. After doing a massive amount researching for the best material possible to use instead of PVC, 8020 Aluminum T-slot material was one of the best options we found. This type of material has a reasonable weight, cost and corrosion. Moreover, this material is strong, stiff and does not break easily. Using T-slots will allow us to use screws rather than glow to put the simulator parts together.
Initial Prototype[edit | edit source]
1.5” 8020 Aluminum T-slot was used as a material to build the initial prototype. 90o plates were used to connect T-slots members together. The dimensions were as same as the old simulator 2.5”x3”x5”. This prototype was introduced to the client to get their opinion. The aluminum might cause damage to the pool’s bottom and edges if it landed strongly. Also, the 90o plates are not perfectly horizontal, which might also damage the edges and bottom of the pool since it has sharp edges. Nevertheless, in order to have more confortable seats, we should consider a wider simulator.
Final Prototype[edit | edit source]
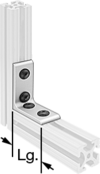
This simulator dimensions have been changed to 3”x4”x5” so we can have more confortable seats that replace the mesh seats. The 90o plates are replaced with extended L brackets and all edges were covered by 6” strips UHMW Polyethylene, that are slippery, abrasion-resistant inserts that allow you to create a smooth motion along a T-slot. And that will avoid any damage that might occur to the pool. The bottom of the simulator was covered entirely with UHMW strips that will provide lass friction.
Finite Element Analysis[edit | edit source]
As part of this project, we conducted elementary Finite Element Analysis using CATIA’s FEA abilities. It was necessary to determine the highest stress points in the design to ensure that failure due to buckling or fatigue would not be an issue. This analysis also allowed us to determine the strength of the hardware chosen in this design.
Choosing Points of Interest[edit | edit source]
One of the difficulties of using CATIA for this analysis, is the inability to recognize assemblies as rigid structures. Each component is treated as an individual structure, which makes the analysis very difficult. In order to analyze the desired points most effectively, we needed to simplify the geometry as much as possible.
Loading Analysis[edit | edit source]
According to our design restraints, the seating configuration needed to be able to hold up to 500 lbs, collectively. For the analysis, we loaded each cross member with a 250 lb linearly distributed load as to best represent two individuals seated across the members.
Analysis of a specific point and safety factors[edit | edit source]
With strength of the aluminum no longer a concern, we could now focus on the strength of the hardware chosen to secure the cross members. The chosen hardware were M8x60mm Grade II stainless steel screws. The specific point chosen for further analysis was where the screw exits the main extrusion and enters the cross member. However, we increased the load to 750 lbf as to analyze the aluminum members and the effect on the hardware.
Team Information[edit | edit source]
| Ali Al-Fayez | Hobbies & Interests: Playing basketball and soccer
|
| Mechanical Engineering Undergraduate | |
| Hometown: Jubail Industrial City, Saudi Arabia | |
| Email: alfa5210@vandals.uidaho.edu | |
| Abdulhady Alhajeri | Hobbies & Interests: Playing volleyball
|
| Mechanical Engineering Undergraduate | |
| Hometown: Kuwait City, Kuwait | |
| Email: alha8780@vandals.uidaho.edu | |
| Jacob Lemmelin | Bio:Jacob Leopold Lemmelin is a Naval Reserve Officer Training Corps student at the University of Idaho, wishing to pursue a career of aviation through the United States Navy. Following graduation, he has orders to head to air station Pensacola in Florida to begin flight school, and completes his commissioning on Friday, December 11th, 2015. He is graduating with a Bachelor of Science in Mechanical Engineering at the University of Idaho.' |
| Mechanical Engineering Undergraduate | |
| Hometown: | |
| Email: lemm1420@vandals.uidaho.edu | |
| Colin Sowards | Hobbies & Interests: Fly fishing
|
| Mechanical Engineering Undergraduate | |
| Hometown: Wasilla, AK | |
| Email: sowa2808@vandals.uidaho.edu |
Document Archive[edit | edit source]
File:Final Assembly Instructions.pdf


