Braille Business Card Stamp
| [[File:|300px|center|alt=]] | |
| Sponsors | Center for Disability Access and Resources |
| Team Name | Vandal Printers |
| Duration | Summer 2020 |
| Faculty Adviser |
|
| Mentor |
|
| Client |
|
| Team Members |
|
Problem Definition[edit | edit source]
The objective of this project is to create a simple, robust, and durable design for a 3D printed braille business card printer. The device should be fabricated from primarily 3D printable parts, but also be sized appropriately to minimize cost while maximizing functionality and longer-term reliability.
Background[edit | edit source]
Today, open-source designs for printing braille onto existing business cards are available. This makes it relatively easy for one download the design and fabricate the components using a standard 3D printer. In many cases, design users may print out the components at a local library. While these designs may be helpful, they are often found to have very low durability, or may not function correctly if printed with poor quality.
Braille Code[edit | edit source]
Braille is a tactile writing system used by people who are visually impaired. Traditionally, it is written with embossed paper but it is not uncommon to find it on other materials just as different woods, plastics, and metals.
Considering that the whole language is read through touch the length of braille words compared to written English is much longer. To combat that issue there are many short handed indicators to help save space.
Deliverables[edit | edit source]
1) An updated design for 3D printing a reliable and cost effective device.
2) Documentation of the design including 3D printable models and drawings.
3) A manufacturing plan and instructions including complete BOM and estimated cost for anyone to manufacture.
Design Development[edit | edit source]
Braille Indentation test[edit | edit source]
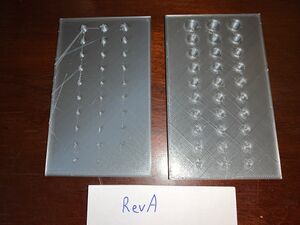
The indentations for braille have been standardized following the ADA Laws and Regulations standard for braille placement and reading. This tells us the dimension of the dots that should be formed from how big they need to be, to depth, and spacing from one another. However with the stamping configuration that we had in mind in our design, our team did not know the best way to dimension the extruded and inverted bubbles to help form the appropriate sizes of dots. This lead us to a development of rapid prototyping, 3D printing multiple revisions and testing on the business card stock to demonstrate the tests.
3D Printer Tolerances[edit | edit source]
When 3D printing parts, you'll find that your final part does not match up exactly to the drawing. They will be printed out to the nearest tolerances specifications that your slicer software is set to. Due to this issue, we had to test our design tolerance specifications to make sure that our parts would mate together properly. During our testing phase we found out that we need a tolerance of 15 thousands of an inch to make the parts snug and tight.
Prototype 1[edit | edit source]
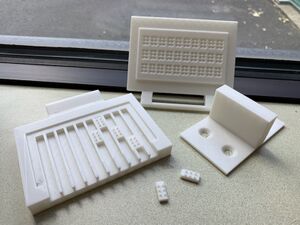
The picture as shown is a representation of our first iteration of our design and prototype 1. We as a team decided to shift focus from a roller push through design to a stamp press design. The roller design was not as easy to used as people wanted it to be. As well as the change over process was not as efficient as it could be, requiring the user to 3D print brand new parts if they wanted to change the lettering. What we wanted to do was create it so that a person can easily us the stamp press, along with have the capacity to easily change out characters for quick change overs. The Slotted design allows for character letter to be placed into position, this also allows the user complete character customization.
Prototype 2[edit | edit source]
The following pictures above showcase our prototype 2 design. It is designed to be quick and easy to use by allowing users the opportunity to quickly change what information is being transferred onto a business card. For a regular business card we are able to have a 3 by 10 matrix of characters that the user is able to use. The prototype is used like a stamp press. You slide in the desired characters, place in the business card, close the stamp, and press firmly to emboss the braille letters into the business card. Giving a readable clean cut business card with the desired contact information embossed in it.
This prototype is now on Rev D. Dot sizes were changed to provide a better tactile feel and more consistent results. The dot spacing was shrunk slightly to increase the previous 10 column configuration to 12 columns. This prototype still has some problems that we are currently working on fixing. The first big challenge is the amount of force required to indent all the lettering. We have printed a full piece for each available location to simulate a worst case scenario for force required, and it is very difficult if not impossible to do by hand. Our first idea of attaching a lever by melting an additional part onto the top surface of the stamp, this failed. Currently, we are brainstorming other ways to work around this problem.
File:00-00 STAMP.pdf File:00-01 STAMP.pdf File:00-02 STAMP.pdf File:00-04 STAMP.pdf File:00-05 STAMP.pdf
Validation[edit | edit source]
In the attached files below is our Design Validation Document. It is the document that describes all of the reasons why we choose the designs that we did. From tolerance testing all the way to final design project.
Future Updates[edit | edit source]
1. The final Design is going through the University of Idaho on a pattern disclosure forum. So the majority of our focus will be following up with that a seeing where that goes.
2. We have also worked on a storage box for the product, however we were unable to implement them before the final design. The next step was to incorporate this into the project. The box was designed to fit all of the components into one place, with the characters and parts all having there own space.
Team Members[edit | edit source]
| Andrew Neel |
Major: Mechanical Engineer Hometown: Bellevue, Idaho Responsibility: Designer Lead, Wiki Page Assistant and Client Contact Lead Email: neel0413@vandals.uidaho.edu |
| Hussain Imailu |
Major: Mechanical Engineer Hometown: Saudia Arabia Responsibility: Meeting Minutes, Documentation Manager, and Portfolio Lead Email: imai4759@vandals.uidaho.edu |
| John Cosso |
Major: Mechanical Engineering Hometown: Meridian, Idaho Responsibility: Testing Lead and Budget Tracker Email: coss5893@vandals.uidaho.edu |
| Cody Wills |
Major: Mechanical Engineer Hometown: Treasure Valley, Idaho Responsibility: Wiki page lead, Meeting Lead and Design Assistant Email:will8848@vandals.uidaho.edu |
Additional Documentation[edit | edit source]
Project Schedule http://images.shoutwiki.com/mindworks/b/b8/ME_424_Braille_Project_Schedule.pdf
Design Validation File:ME 424 Braille Design Validation Plan.pdf
Project Budget File:ME 424 Braille Project Budget.pdf


