UI CETL - Lightboard
| [[File:|300px|center|alt=]] | |
| Sponsors | University of Idaho CETL |
| Team Name | Buzz Lightboard |
| Duration | Summer Fall 2018 |
| Faculty Adviser |
|
| Mentor |
|
| Client |
|
| Team Members |
|
The goal of the project is to design and create an easy to use and cost effective lightboard for CETL at the University of Idaho.
Problem Definition[edit | edit source]
Background[edit | edit source]
Main Purpose
A lightboard is an apparatus that is used in many universities today. It is primarily used in online and flip classes where the main form of information obtention is done by watching videos or lectures online. The lightboard is a preferred method of teaching by some professors because it provides a more personal experience than either a normal whiteboard or a document camera. The lightboard will especially shine in the University of Idaho's Engineering Outreach program and other classes like it because of the professor's ability to answer real time questions about topics while still looking into the camera and being able to write. It will also allow professors to prerecord lectures that they want to do and edit them into such a way that there is more information and less filler time.
How it Works
The lightboard will function using a principle called frustrated total internal reflection. This principle states that light within a medium will internally reflect because of the differences in two indices of refraction. However, when you put a marker on the glass, it will disrupt the angle at which the light will reflect, frustrating it. The frustrated light will then both reflect internally and emit light out of the glass, giving the marker the illuminated look that the lightboard is known for.
Deliverables[edit | edit source]
The Lightboard must act as a see-through, portable whiteboard that can be used in tandem with a filming system so that instructors may teach online and filmed classes while looking directly at the camera. The Lightboard must be produced for a fraction the price of a complete one that can be purchased online. The design must also be able to easily be transported around campus for wide use.
Specifications[edit | edit source]
Functionality/Usability
- Writing on the board must be bright and easily visible as a result of “frustrated total internal reflection”
- Writing on the lightboard should be comfortable for a wide range of users
- An easily accessible area for notes, books, resources, and marker storage will be integrated into the design of the lightboard
- LED lights must be dimmable and easily adjusted by the user without leaving the viewing area.
- Thin sheets of frosted plastic can be attached to the viewer side of the glass in multiple locations for projections to be utilized
Mobility
- The lightboard can be moved around on flat ground by a single user safely
- Components of the board must be capable of fitting through a standard door (6’8” x 2’6”) without substantial disassembly or time investment
- The Enclosure shall fit within the following:
- Length < 8 ft
- Width < 5 ft
- Height < 7 ft
Safety
- The frame design shall be sturdy enough to support the glass pane with a generous factor of safety
- The Lightboard should resist tipping when a reasonable force is applied to the upper regions of the board
- All electrical safety regulations will be met.
Cost Effectiveness
- Cost to build a Lightboard prototype shall not exceed $2000
Prototype Design[edit | edit source]
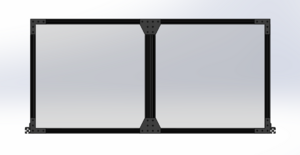
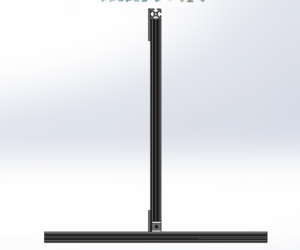
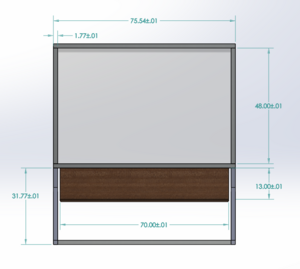
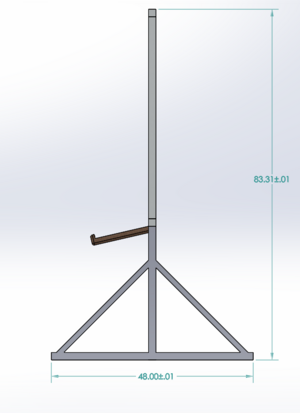
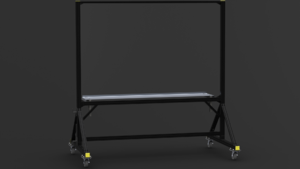
| Front View | Side View |
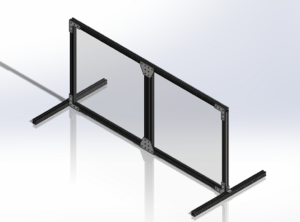
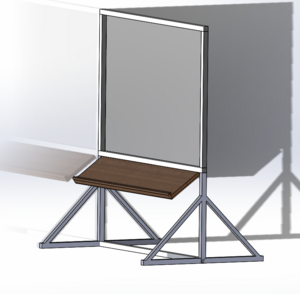
| Isometric View |
Design Points[edit | edit source]
The prototype is a double light board on a smaller scale. It is made from 8020 t-slot extruded aluminum and fastened together with laser cut pieces of wood and screws. There are two different panes of glass inserted into it: Starphire Glass and Window Glass. The LEDs were strung around all four sides of each pane of glass and connected to a dimmer so that the amount of light present in the glass can be controlled. The prototype was made to be easily taken apart so that the LEDs can be rearranged. This prototype directly compares the two pieces of glass under the same conditions, something that is not able to be found anywhere on the internet.
Testing[edit | edit source]
We tested and are testing our prototype in many different ways. The planned tests included choosing which glass to use for our final design, how different the intensity of the markers show up when the lighting arrangements are done, and lastly the effectiveness of projecting an image onto the lightboard. Our goal was to measure each test in three different ways: how it looks in person, how it looks on camera, and how it looks on a video.
Glass Comparison
This test was conducted fairly easily because all we needed to do was turn on the lights and write on the board. The difference between the Starphire glass and window glass was evident right away. Starphire glass produced a clearer and more vibrant color than the window glass did. The Starphire glass' ability to let light penetrate it created a more consistent color across the entire board and did not let the markers fade further away from the source of the light. In a photograph, it is also easily discernible which pane is the Starphire and which is just the window glass.
Lighting Arrangements
Our prototype has LEDs wrapped around all four sides of the glass panes, and this allows for the most amount of light to penetrate into the pane. However, we are curious about how the writing would show up if the glass were to be lit up by only one or two sides. Our plan for this test is to run LEDs through the glass in different arrangements to see how the marker vibrancy changes.
- One side
- We know that with one side illuminated there will be a noticeable difference and the lightboard will not be very effective. However, our plan for that arrangement is to measure the difference in vibrancy of the colors as it travels away from the light source. Our hopes with this test is that we will be able to see how far the light travels through each pane of glass and whether or not there is a "dead zone" where the light doesn't touch in the pane that will make the marker look worse than it would with all four sides illuminated. If there is an obvious "dead zone" then we should be able to measure it and have a reasonable expectation for the final 4'x6' sheet of glass.
- Two sides
- Illuminating edges, which will most likely be the top and bottom, is a way for us to test how important the illumination of the sides are. If the sides prove to be detrimental to the overall quality of the lightboard then we will plan on incorporating all four sides of the pane. At this time, however, this is simply a test to see what we can learn about each type of glass. Our hopes with this test is that the light coming from both sides act as additives to each other and will illuminate arguably the most important part of the board: the middle.
Projection
For this test, we plan on putting a piece of frosted plastic, or something similar, on the lightboard and projecting an image onto it. This proves to be useful because it would allow the user to keep something permanent and neat that they can continuously reference on the lightboard while teaching. We are not sure how well the projected image will show up, or whether the user would be able to mark up the image. Our test will be comprised of the actual projection and its clarity as well as the ability to write on or around the projected image. The difficulty will come into place when it comes time to record though. We are not sure that if the focus on the whiteboard to allow the writing to be clear would mess up the projection filming; however, this is not part of the scope of our project, and we will probably have to outsource it to someone more experienced in the filming department.
As of right now, the projection aspect of the project has been temporarily stopped in order to focus on finishing the remainder of the project.
Decision Points
There are three main points to this design: the frame, the shelf, and the glass.
| Frame
Our initial thought for the frame was to be made of either extruded aluminum or wood. The frame is an essential part of the design because it will have to be able to support a large sheet of glass, the aforementioned shelf, and the force of a human being writing on the glass. Right now, our plan is to design the frame out of aluminum because we believe that it will be the easiest to work with as well as strong enough to withstand all acting forces from the lightboard. Our initial design has triangles at the base to withstand the weight of everything. We chose this because we believe that the triangle will be able to distribute the weight better, allowing us to make a sturdy lightboard. | |||
| Shelf
The shelf is a part of the design that our group came up with because of our client's initial request. Initially, Brian had requested a detachable sheet of glass so that he could put it on his desk and use it there. This had us thinking about the possibilities include a usable "desk" with the stand up lightboard. Right now, our shelf is planned to be attached using brackets that can extend into a 90° angle so the operator can decide whether or not they would like to use the shelf. It will be made out of wood and need to withstand the weight of multiple books or a laptop. A feature that we would like to add to the shelf is a marker holder. This would allow the user to have an easy spot to keep their markers and are able to easily change colors if needed. | |||
| Glass
The glass is the most integral part of the entire design. Clarity, price, and toughness are all considerations when comparing different types of glass. Our choices for glass are plexiglass, window glass, and Starphire glass.
|
Final Design Mockup[edit | edit source]
| Front View | Side View |
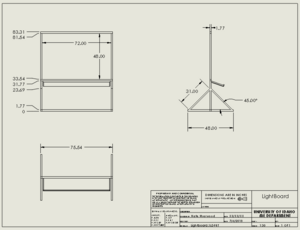
| Isometric View | Drawing |
- All dimensions shown are in inches.
Final Design[edit | edit source]
Decisions[edit | edit source]
| Frame
After our second design review, the decision made by our group, Brian, and Doctor Swenson was to move forward with the 8020 extruded aluminum, but instead of the common silver, we opted for black anodized. Our reasoning for choosing this for our frame was because of the usefulness in assembly of the overall product as well as giving it a more "finished" look. |
| Shelf
The shelf was created as a use for operators to hold different resources while they are teaching. The shelf was created out of a sheet of aluminum from UI Facilities and is fastened to supports that have the ability to angle at 90°, 45°, and straight down for storage and transport. |
| Glass
As demonstrated above, the starphire glass was the obvious option for the lightboard. The sheet of glass' size and the ability of light to penetrate through starphire glass makes sure that the lightboard is functioning to the best of its ability by providing the most vibrant colors. |
Safety Calculations[edit | edit source]
| Tipping Force
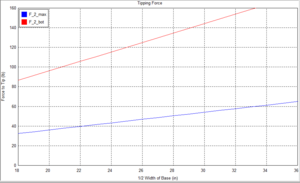
Looking at a force that is placed at the top of the board, it was calculated that the board can survive a force of 34.14 lb of force, however the board will roll before it ever gets close to tipping over. |
Beam Bending
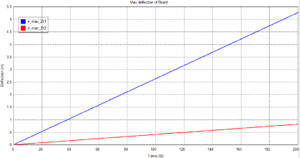
Both plots depict the deflection of the bottom support leg. The blue line represents the deflection if the beam were to be a 1"x 1", and the red line is if it were 2" x 2". If there was a 215 lb force applied directly to the center of that beam, then there would be 0.1292" of deflection. |
| Wind Speed
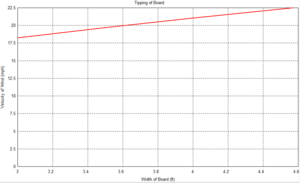
This plot represents the wind speed that the board can handle before it tips over. Using the dimensions of the board and the drag equations, it was calculated that the board would be able to withstand an 18.7 mph gust of wind before it tips over. But like the tipping force, it is suspected that the board would roll before tipping. |
Shelf Calculations
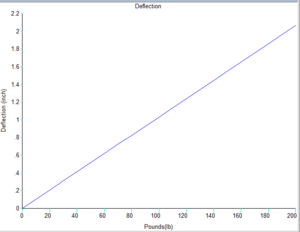
This plot shows how much our shelf will deflect if a 100 lb force was placed directly in the center. The calculations show that the shelf would deflect by 1.03 in, but in any real world application, no force will be a point load, but a distributed load that is not completely focused at the most vulnerable part of the design, and 100 lb is a gross overestimation of what was believed to be used on the shelf. |
Both the Tipping Force and Wind Speed plots have an independent variable of width (in.). This was because the width of the support beam became a variable that was needed to work around and it was more likely to see what forces the lightboard could withstand instead of building the board to specifications that were desired.
Finished Product[edit | edit source]
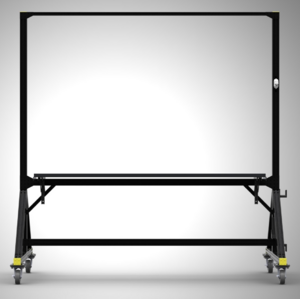
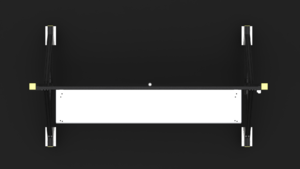
| Front View | Top View |
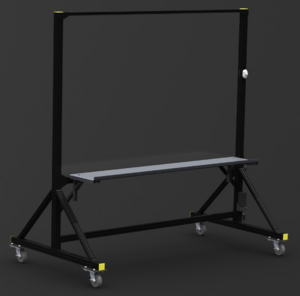
| Isometric View | Back View |
Team Members[edit | edit source]
| Talal Aldoussari
Major: Mechanical Engineering
| |
| Jake Jermyn
Major: Mechanical Engineering
| |
| Nate Sherwood
Major: Mechanical Engineering
| |
| Taylor Spence
Major: Mechanical Engineering
|
Additional Documentation[edit | edit source]
Project Schedule
File:2018 Buzz Lightboard Schedule.pdf
Budget
File:2018 Buzz Lightboard Budget.pdf
Meeting Minutes
File:2018 Buzz Lightboard All Agendas.pdf
Presentations
- Design Reviews
Client Interview
